Entering Zero Dollar Invoices
Updated 02/11/2021
Printable Version |
Oracle R12 - Quick Reference Guide |
Note: All $0.00 Invoices should be recorded as manual payments after all steps in this QRG have been completed. For details on how to perform a manual payment see the QRG titled - ENTERING AND RECORDING A MANUAL PAYMENT.
Introduction
This QRG has information on how to fix entries related to:
- Using the wrong accounting strings
- Using the incorrect Project (POET information)
- Referencing the wrong Purchase Order or Purchase Order lines
Invoices > Entry > Invoices
Invoice Workbench
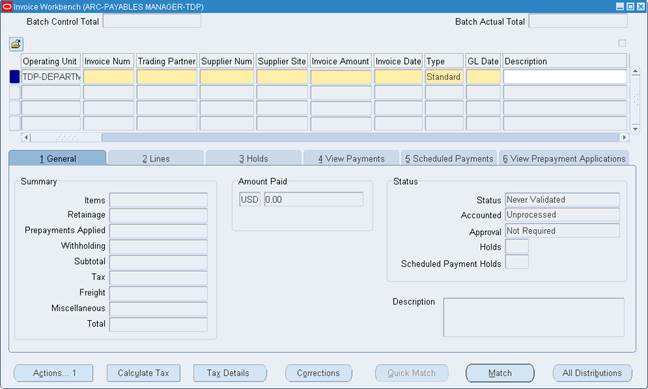
To enter a zero dollar invoice, complete the following steps:
| Step Number | Field Name | Description | Action |
|---|---|---|---|
| 1. | Operating Unit | Operating unit invoice is to be entered for. | Defaults based on responsibility or Select from list of values (LOV). |
| 2. | Type | Document Type | Select 'Standard' for corrections of Non-Matching Invoices (this is the default). Select 'Mixed' for corrections involving matching to the correct purchase order. If you do not choose mixed, the correction document will not be able to be validated and must be cancelled. |
| 3. | Invoice Num | Vendor’s invoice number - See Document Numbering Scheme. This is the addendum information that goes to the vendor (comments to print). Do not use special characters (e.g. “*”) in the invoice number, or enter spaces after the invoice number. Using special characters in the invoice number or adding spaces after the invoice number, can cause the SPS payment file to fail to upload into the SPS system. Please note when entering an invoice that has Project Accounting invoice numbers need to be 30 characters or less. |
|
| 4. | Supplier | Supplier Name | Enter the Supplier Name or Select from the LOV. |
| 5. | Supplier Number | Supplier Number | Defaults if Supplier entered first or Select from LOV. |
| 6. | Supplier Site | Supplier Site | Defaults based on Supplier Number, otherwise select from LOV. |
| 7. | Invoice Amount | Invoice Amount | Enter $0.00. |
| 8. | Invoice Date | Invoice Date | Enter date listed on invoice in MM/DD/YYYY format or Select from calendar view. |
| 9. | Log/Accepted Date | Log/Accepted Date | Enter the later of log or delivery/acceptance date in MM/DD/YYYY format. |
| 10. | GL Date | Determines the accounting period. | Defaults to the system date. You will need to change if attempting to post in a period other than the current period. The format is MM/DD/YYYY. |
| 11. | Description | Invoice Description | Description of the invoice. Can be used to help a customer identify the purpose of the transaction. Note: This will not display on the payment record sent to the supplier. |
| 12. | [ ] | These fields are Descriptive Flexfields, which captures additional information for the invoice header. | If choosing Check as Payment Method, you will need to update the EFT Exception Reason Code with “Correction". If the corrections you are making do not involve matching to a Purchase Order that has been created in Prism, you should change the SEND INVOICE TO PRISM flexfield to “No”. |
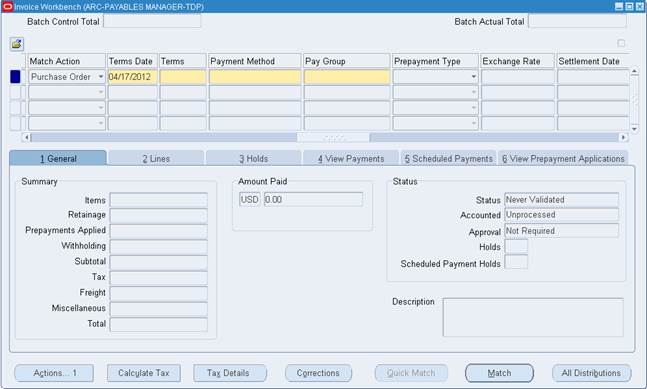
| 13. | Terms | Terms of Invoice | Enter ‘Immediately’ if these terms have not already defaulted. |
| 14. | Payment Method | Payment Method | Defaults based on the supplier. If the Payment Method is Check or Interagency, leave the default value. If the Payment Method is Electronic, you must change the value to check. |
| 15. | Pay Group | Used to select invoice for payment | Change the pay group to “Manual Pay In Full”. |
| 16. | Payment Reason | Payment Reason | Defaults in from Trading Partner entered. |
Your next action will depend on what you are trying to correct. Click on the appropriate link below.
- Correcting a Match to the Wrong Purchase Order
- Correcting Accounting Strings
- Correcting Incorrect Project (POET information)
After you have made all necessary corrections and validated the invoice, you will need to pay the invoice in full. Refer to the QRG titled ENTERING AND RECORDING A MANUAL PAYMENT.
Correcting Matches to Incorrect Purchase Orders
This section is only for matching to correct transactions involving the wrong Purchase Order. *If you do not need to match, you may skip this section.
| Step Number | Field Name | Description | Step |
|---|---|---|---|
| 1 | Match button | Creates a Match to a PO | Click on the Match button.This will bring up the Find Purchase Orders for Matching Window. |
Find Purchase Orders for Matching Window
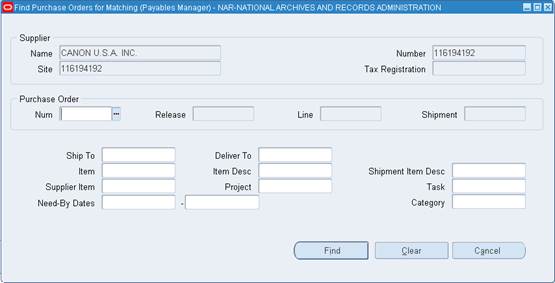
Perform the following steps to find purchase orders for matching:
Important: You will need to match against both the PO that was matched by the original invoice and the PO that should have been matched to the original invoice.
| Step Number | Field Name | Description | Action |
|---|---|---|---|
| 1 | Purchase Order Num | Lists the Purchase Orders for that vendor. | Select the PO number |
| 2 | Find Button | Finds the Purchase order selected. | Click the Find button.This will bring up the Match to Purchase Orders Window. |
Match to Purchase Orders Window
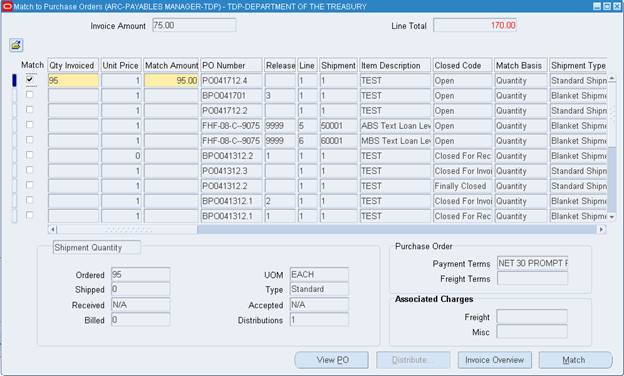
Perform the following steps on the Match to Purchase Orders window:
| Step Number | Field Name | Description | Action |
|---|---|---|---|
| 1 | Match checkbox | Selects the PO shipment to match to the invoice. | Check the Match checkbox next to the shipment line of the Purchase Order that you want to match against. |
| 2 | Qty Invoiced | Amount to match to the PO line | Enter the same quantity that was used to match to the incorrect PO.Copy the quantity directly from the applicable shipment on the PO Summary to insure correctness. If you are matching to the incorrect PO, enter a negative quantity. If you are matching to the correct PO, enter a positive quantity. |
| 3 | Unit Price | Price per Unit Ordered | Do not update this field. An error message will be received if you do and attempt to save. |
| 4 | Match Amount | Amount to match to the PO | Tab to this field.Oracle will calculate the match amount by multiplying the quantity billed by the unit price. |
| 5 | Match button | Matches the invoice to PO | Click the Match button. |
| 6 | OK button | Saves the transaction | Click the OK button. |
| 7 | Repeat steps 1 through 6 until all incorrect lines have been replaced by corrected accounting strings. | ||
| 8 | Save Icon | Saves any pending changes | Click on the Save Icon (Yellow Disk) |
| 9 | Exit | Exit the screen | Select the X in the top right corner of the Distribution screen |
Repeat the matching process until you have corrected all needed lines.You will have a positive match and a negative match for each matching line you are correcting.
You should now validate the invoice.Please go to that section by clicking on link to the left.
Correcting Wrong Accounting Strings
This section is only for correcting transactions that involve incorrect accounting strings.*If you are correcting Purchase Orders matched to only, you may skip this section.
| Step Number | Field Name | Description | Action |
|---|---|---|---|
| 1 | Lines tab | Takes you to the Lines section. | Click on the Lines tab this will open the Lines form. |
| 2 | Amount | Amount of the line. | Enter zero. |
| 3 | Distributions button | Distributions button. | Select the distributions button to enter distributions to be tied to the line. |
| 4 | Type | Distribution Type | Defaults to 'Item'. Do not change. |
| 5 | Distribution amount | Amount of Distribution | Enter the dollar amount for the distribution. If this distribution is to reverse prior accounting, enter the amount as a NEGATIVE. If this distribution is to enter the correct accounting, enter the amount as a POSITIVE. |
| 6 | Account | Accounting String (AFF) | If this ties to negative amount enter the accounting string(s) from the invoice(s) you are correcting. If this ties to the positive amount enter the correct accounting string. |
| 7 | GL Date | Used to determine accounting period | Defaults to system date.May need changed to reflect proper accounting period. |
| 8 | Description | Description for distribution line. | Enter a description for the correction being made. |
| 9 | Global Descriptive Flexfield - GDF ( ) | GDF - ( ) | Non-Federal Suppliers - The BETC (Agency BETC) will default as DISB, It is not necessary to enter the ( ) GDF field unless the default should be updated. Federal Suppliers - Click into the ( ) GDF. Click the Context Value LOV. Context Value will populate with ‘US Federal Attributes’.Populate the Trading Partner TAS. The Trading Partner BETC will default based on the Trading Partner TAS. BETC (Agency BETC) is also required and will default as DISB but can be edited if appropriate. |
| 10 | [ ] - Descriptive Flexfield (DFF) | Descriptive Flexfields - Additional fields used to capture information for reporting purposes. | Enter the same information that was entered for the distribution line(s) being corrected. |
Repeat steps 1 through 10 until all incorrect lines have been replaced by corrected accounting strings.
| Step Number | Field Name | Description | Action |
|---|---|---|---|
| 11 | Save Icon | Saves any pending changes | Click on the Save Icon (Yellow Disk). |
| 12 | Exit | Exit the screen | Select the X in the top right corner of the Distribution screen. |
You should now validate the invoice. Please go to that section by clicking on the link.
Correcting Incorrect Project (POET information)
This section is only for correcting transactions that involve incorrect accounting strings.*If you are correcting Purchase Orders matched to only, you may skip this section.
| Step Number | Field Name | Description | Action |
|---|---|---|---|
| 1 | Lines tab | Takes you to the Lines section. | Click on the Lines tab this will open the Lines form. |
| 2 | Amount | Amount of the line | Enter zero. |
| 3 | Distributions button | Distributions button | Select the distributions button to enter distributions to be tied to the line. |
| 4 | Type | Distribution Type | Defaults to 'Item'.Do not change. |
| 5 | Distribution amount | Amount of Distribution | Enter the dollar amount for the distribution. If this distribution is to reverse prior accounting, enter the amount as a NEGATIVE. If this distribution is to enter the correct accounting, enter the amount as a POSITIVE. |
| 6 | Account | Accounting String (AFF) | Do not populate this field as the POET information should be entered which will then auto populate this field. |
| 7 | Project | The Project the distribution needs tied to. | If this ties to negative amount enter the Project from the invoice(s) you are correcting. If this ties to the positive amount enter the correct accounting string |
| 8 | Expenditure Organization | Expenditure Organization ties to the Internal_ORG AFF value. | If this ties to negative amount enter the Expenditure Organization from the invoice(s) you are correcting. If this ties to the positive amount enter the correct Expenditure Organization |
| 9 | Expenditure Type | Expenditure Type ties to the BOC AFF value. | If this ties to negative amount enter the Expenditure Type from the invoice(s) you are correcting. If this ties to the positive amount enter the correct Expenditure Type to be billed. |
| 10 | Task | There is at least one task per Project. | If this ties to negative amount enter the Task from the invoice(s) you are correcting. If this ties to the positive amount enter the correct Task. |
| 11 | Expenditure Item Date | This date should match the GL date entered on the invoice distributions. | Defaults to GL date entered on invoice header. May need changed to ensure it matches to GL date on distribution. |
| 12 | GL Date | Used to determine accounting period | Defaults to system date.May need changed to reflect proper accounting period. |
| 13 | Description | Description for distribution line. | Enter a description for the correction being made. |
| 14 | [ ] - Descriptive Flexfield (DFF) | Descriptive Flexfields - Additional fields used to capture information for reporting purposes. | Enter the same information that was entered for the distribution line(s) being corrected. |
| 15 | Global Descriptive Flexfield - GDF ( ) | GDF - ( ) | Non-Federal Suppliers - The BETC (Agency BETC) will default as DISB, It is not necessary to enter the ( ) GDF field unless the default should be updated. Federal Suppliers - Click into the ( ) GDF. Click the Context Value LOV. Context Value will populate with ‘US Federal Attributes’.Populate the Trading Partner TAS. The Trading Partner BETC will default based on the Trading Partner TAS. BETC (Agency BETC) is also required and will default as DISB but can be edited if appropriate. |
Repeat steps 1 through 14 until all incorrect lines have been replaced by corrected POET strings.
| Step Number | Field Name | Description | Action |
|---|---|---|---|
| 16 | Save Icon | Saves any pending changes | Click on the Save Icon (Yellow Disk) |
| 17 | Account | Accounting string (AFF). Once the distributions were saved the POET information should cause the Account field to auto populate. Note: The Default USSGL will be populated but must be updated to the appropriate USSGL, i.e. 61000001 |
Once charge account populates update the USSGL to the appropriate USSGL, i.e. 61000001. |
| 18 | Exit | Exit the screen | Select the X in the top right corner of the Distribution screen |
You should now validate the invoice. Please go to that section by clicking on the link.
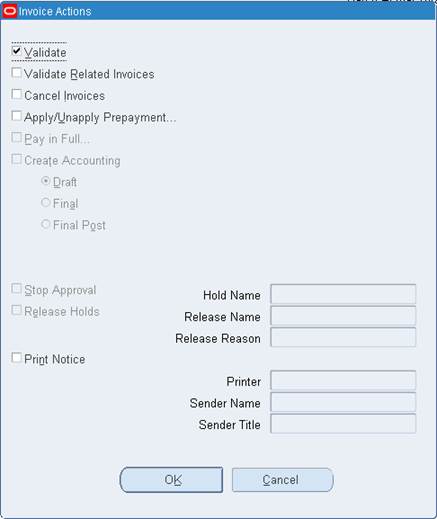
Validating the Invoice
| Step | Field Name | Description | Action |
|---|---|---|---|
| 1 | Actions... Button | Validates the document | Select the Validate checkbox. |
| 2 | OK button | Confirms the validate action | Click the OK button. |
| 3 | Status | Status of the document | Make sure the status of the document is 'Validated'. |
| 4 | Global Descriptive Flexfield - GDF ( ) | GDF ( ) | Click All Distributions.Review the GDF ( ) values for BETC, which populates from the matched Purchase Order. Update-/Change if necessary.If the values did not populate from the matched purchase order they must be entered and the changes saved. Note: For Federal Suppliers Only, populate the Trading Partner TAS and Trading Partner BETC. For all suppliers BETC is required. |
If you have corrected an IPAC related invoice, you will need to record the transaction in the IPAC Interagency Transfer Window.
Reminder: All $0.00 Invoices should be manually paid.For details on how to perform this step see the QRG entitled - ENTERING AND RECORDING A MANUAL PAYMENT.